You’ve got DataGroomr working for you. You found the duplicates, scored your records, and verified a pile of emails and phone numbers. Nice work!
The problem is, most of your team never logs into DataGroomr. Your sales managers, your RevOps lead, and your VP all live in Salesforce. If your results aren’t in Salesforce, then as far as they’re concerned, it didn’t happen. (I know. It’s not fair. But it’s true.)
So let’s fix that. In this tutorial, I’ll walk you through building Salesforce duplicate reports and a dashboard from your DataGroomr data, using nothing but standard Salesforce reporting.
By the end, you’ll have reports on duplicates, data quality scores, and verification results. You’ll have a dashboard to show them off. And you’ll have an automated sync, so you never have to push the data over by hand again.
Before You Start
You’ll need two things: admin access to Salesforce Setup, and at least one Dedupe dataset in DataGroomr that’s already been analyzed.
Want to report on data quality scores or verification results too? Then you’ll also need a Cleanse dataset with Data Quality Models and/or verification set up.
Everything here uses Salesforce’s standard, out-of-the-box reports and dashboards. No extra licenses, no add-ons. If your team already uses Tableau, CRM Analytics, and any of the other reporting tools, then great! You can take the same synced data and build even more detailed reports there.
Step 1: Create a Duplicate Rule for Each Object
When DataGroomr syncs duplicates to Salesforce, it ties each Duplicate Record Set to a Salesforce Duplicate Rule. So you’ll need one rule for every object you want to report on.
- In Salesforce, open Setup.
- Type Duplicate Rules in the Quick Find box and click Duplicate Rules.
- Click New Rule and choose your object. I set up rules for Contacts and Accounts.
- Give the rule a name that tells you what data it represents.
- Save the rule, then Activate it.
- Repeat for any other objects.
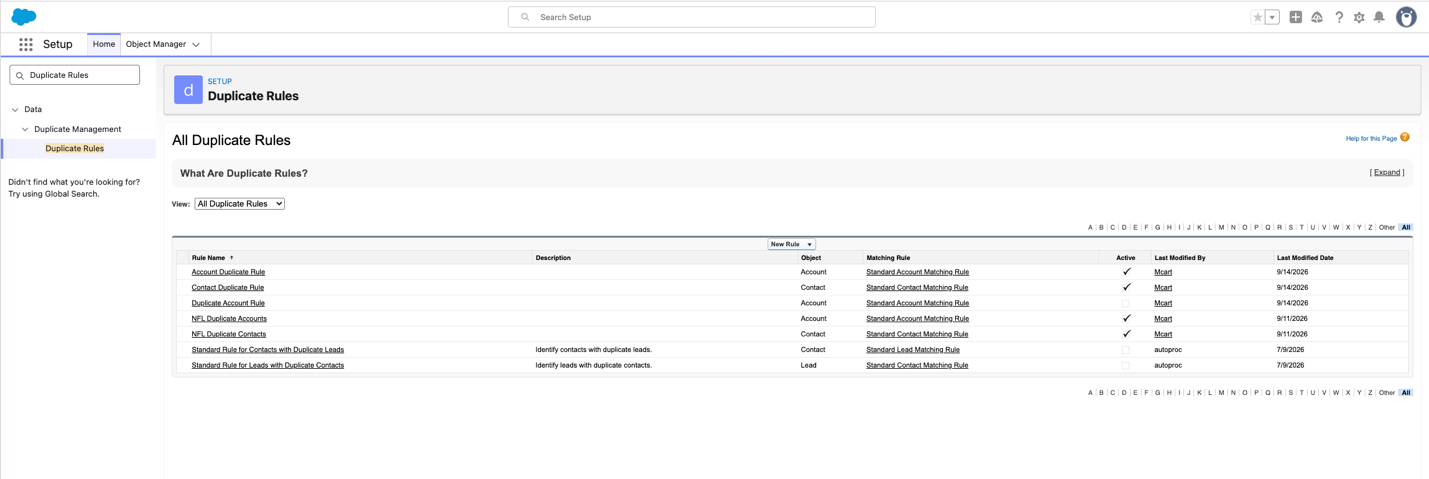
The exact configuration doesn’t matter much, because DataGroomr is doing the real duplicate detection.
One catch, though. An active rule also runs when users create or edit records. If you don’t want your reps getting surprise pop-ups, set the action to Allow and leave the alert off.
Step 2: Create a Custom Report Type
Salesforce needs a report type before it can report on duplicate sets. Good news: you only need one.
- In Setup, search Report Types in Quick Find and click it.
- Click New Custom Report Type.
- Set the Primary Object to Duplicate Record Sets.
- Enter a display label, description, and category. Pick a category your team will actually look in.
- Click Next.
- Click to relate another object and select Duplicate Record Items. Leave the A-to-B relationship as it is.
- Click Save.
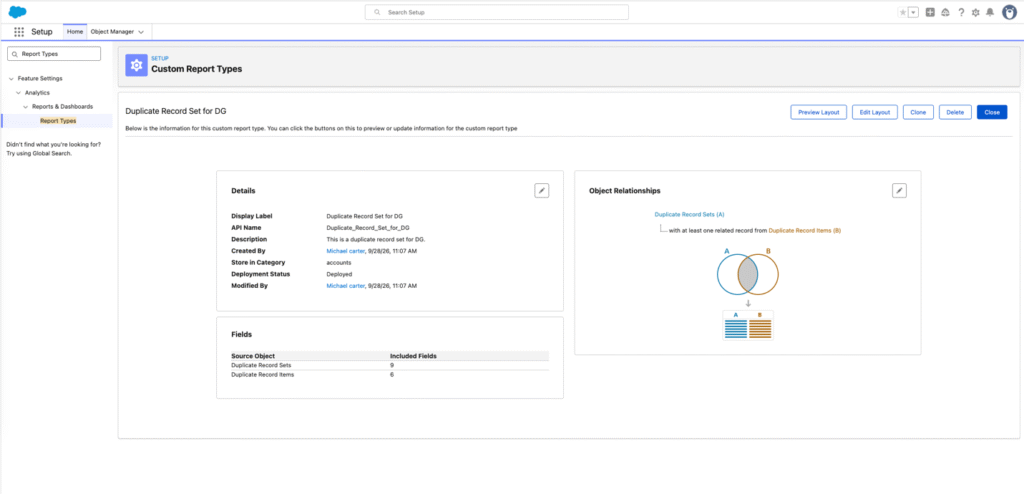
If your profile has the Manage Custom Report Types permission, you can use it right away. Nobody else can see it yet, though. Once you’re ready to share it, change the status from In Development to Deployed.
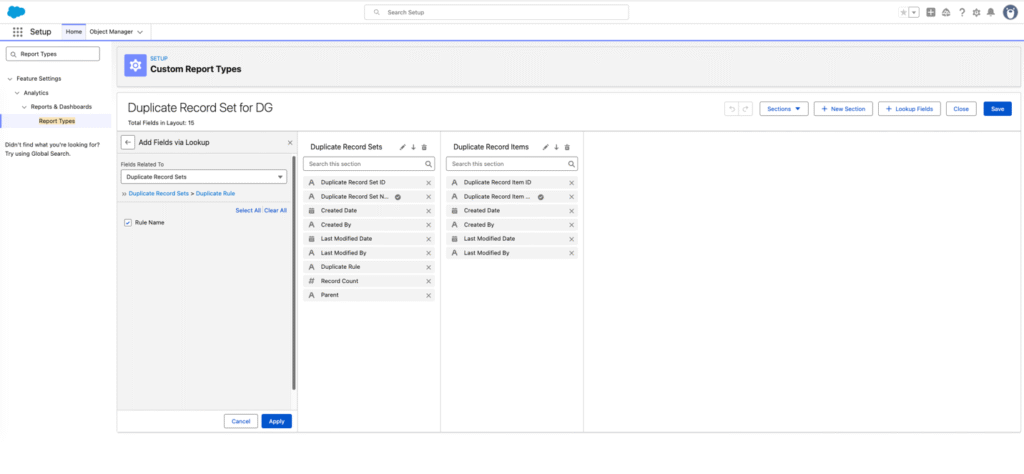
While you’re here, you may want to customize the lookup fields. I recommend adding Duplicate Rule -> Rule Name. This will allow you to show the Rule Name from Step 1 in the report.
- On the custom report type, click Edit Layout.
- Click Add Fields via Lookup.
- Under Fields Related To, choose Duplicate Record Sets.
- Click View Related Fields next to Duplicate Rule, then check Rule Name.
- Click Apply, choose the Duplicate Record Sets section, and click Apply again.
- Save the layout.
Step 3: Sync Your Dedupe Dataset to Salesforce
Now that Salesforce knows where to put the data, let’s send some over.
- In DataGroomr, open Dedupe and go to your dataset.
- Click Sync to Salesforce.
- Choose your match confidence range.
- Select the Duplicate Rule you created in Step 1.
- Confirm.
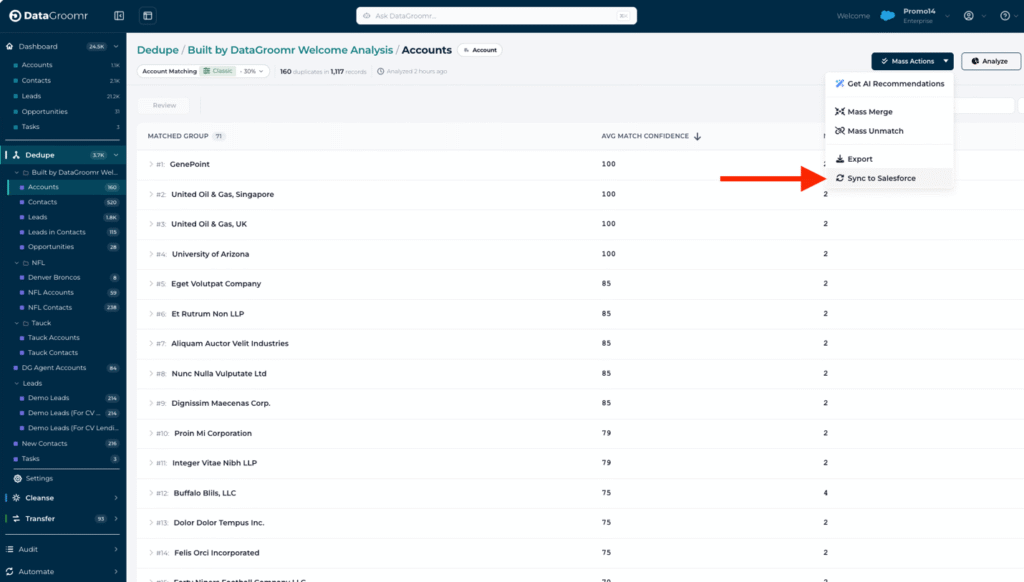
The confidence range controls which matched groups get sent over. A wider range catches more, but it also puts lower-confidence matches in front of your managers.
My advice? Start narrow, and widen it once people trust the numbers.
Step 4: Sync Data Quality and Verification Results from Cleanse
Cleanse works a little differently. Instead of creating Duplicate Record Sets, it writes values right into fields on your Salesforce records.
- In DataGroomr, open Cleanse and go to your dataset.
- Click Sync to Salesforce.
- Choose your score ranges, then pick the verification statuses you want to sync.
- Click Next.
- Map each value to a field on the Salesforce object.
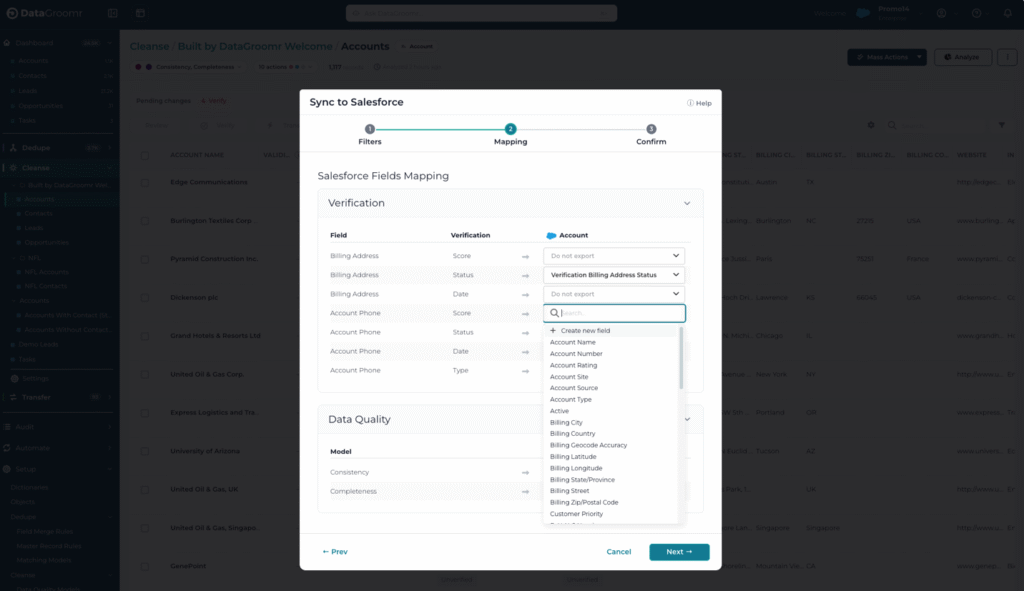
Don’t have a field for it yet? No problem. You can create one right from the mapping screen, and DataGroomr even suggests a name for you. (In my org, the fields already existed, so I just picked them.)
Step 5: Build Your Salesforce Duplicate Reports
Okay, now the fun part. You’ll build two kinds of reports here.
For duplicates:
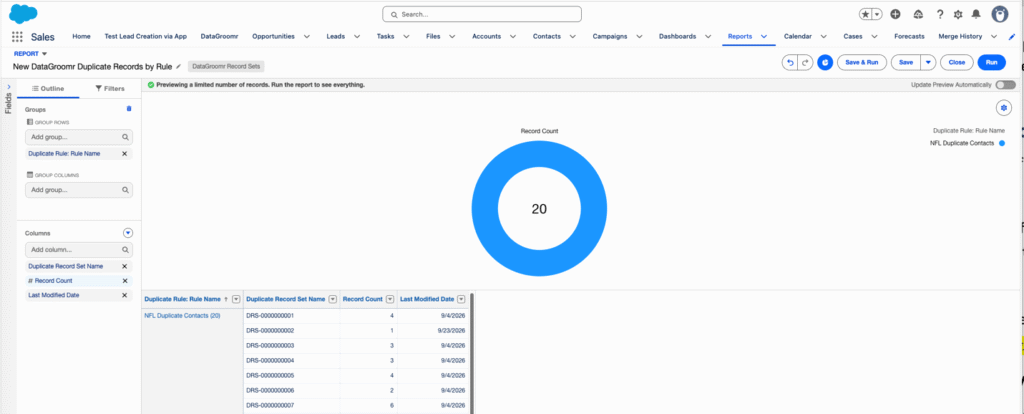
- In Salesforce, go to Reports and click New Report.
- Choose the custom report type you built in Step 2.
- Add the fields your team cares about. Duplicate Rule name is a good one for grouping by object.
- Save the report.
For data quality scores and verification results:
You don’t need to create a new report type for thes. Just use the standard Contacts & Accounts report type and add the fields you mapped in Step 4.
Group by verification status or score, and you’ve got a quick health check on those records.
Step 6: Add Your Reports to a Dashboard
Reports are great, but people have to remember to go open them. (Most won’t.) A dashboard puts the numbers right in front of them.
- Go to Dashboards and click New Dashboard.
- Give it a name.
- Add a chart or table widget from the menu bar at the top of your dashboard.
- Select one of the reports you just created.
- Tweak the widget until it’s easy to read at a glance, then click Add.
- Repeat for your other reports, then save the dashboard.
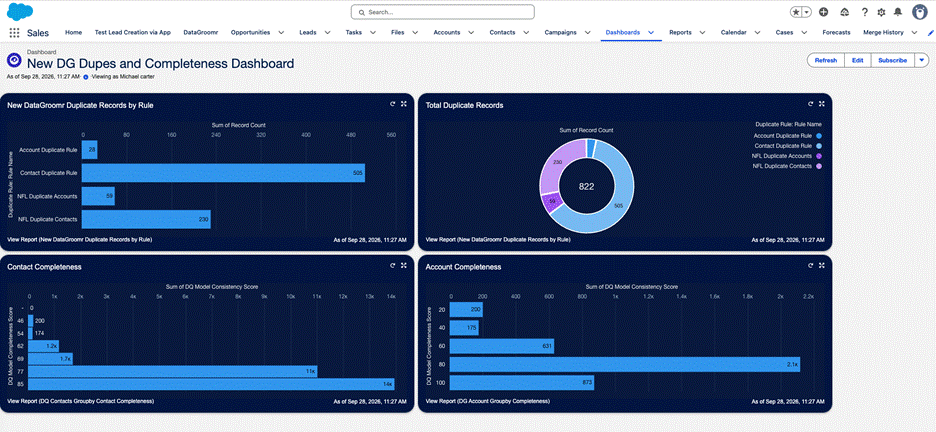
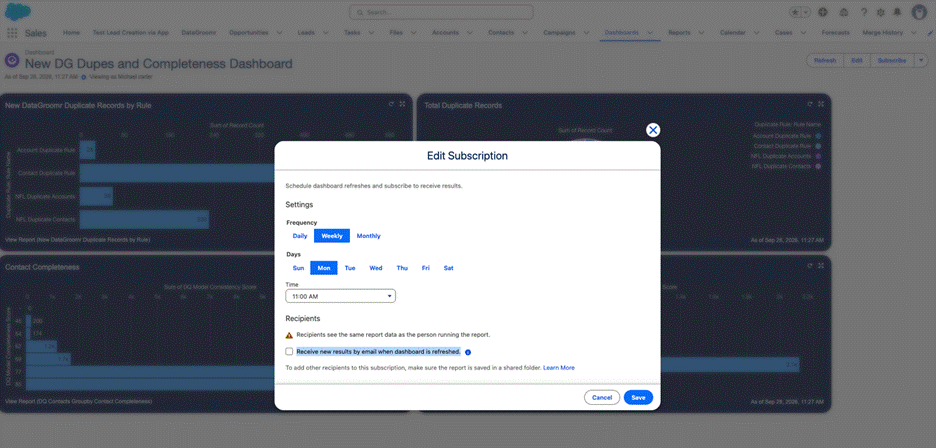
One Salesforce quirk to know about: dashboards only show data as of their last refresh. Sadly, DataGroomr can’t fix this quirk. But if you schedule a dashboard subscription, uncheck “Receive new results by email when dashboard is refreshed,” and set it to run shortly after your workflow we will set up in Step 7, that should take care of it!
Step 7: Automate the Sync
Up to this point, I can tell you’ve been having a blast setting all this up. Well, I regret to inform you that it can all be automated, so you never have to do it again.
In DataGroomr, you’ll use Workflows to run jobs in a sequence. Workflows work a little differently than Scheduled Jobs, because each dataset needs its own analysis job.
Order matters here. You want the analysis to run first, so the sync sends fresh results instead of last week’s.
- Open Automate and go to Workflows.
- Add an analysis job for each dataset you want to refresh.
- Add a Sync to Salesforce job for your Dedupe datasets.
- Click Next, set the schedule, and confirm.
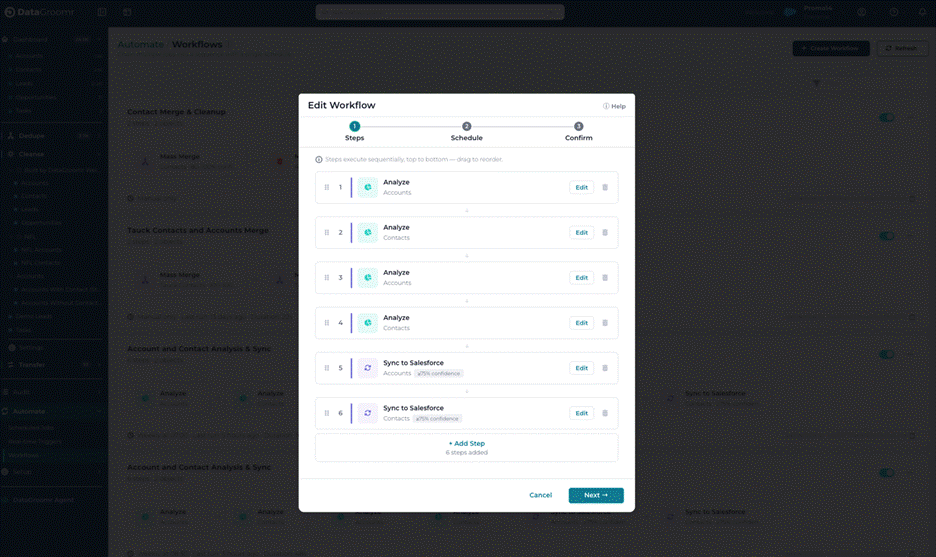
You’ll notice you can’t add Cleanse datasets to a workflow. Cleanse syncs are set up on the models and datasets themselves. Here’s how.
For Data Quality Models:
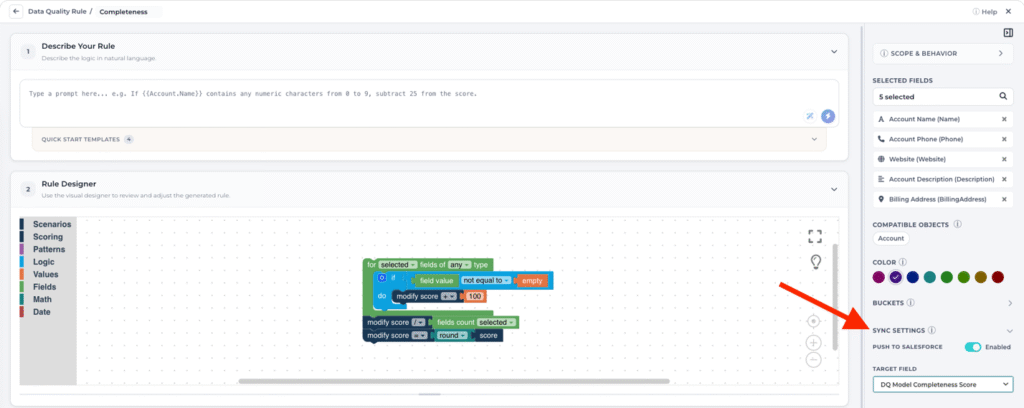
- In Cleanse, go to Settings and click Data Quality Models.
- Edit the model you’re using.
- On the right, expand Sync Settings and turn on Push to Salesforce.
- Choose the target field and save.
- Repeat for any other models you want to sync.
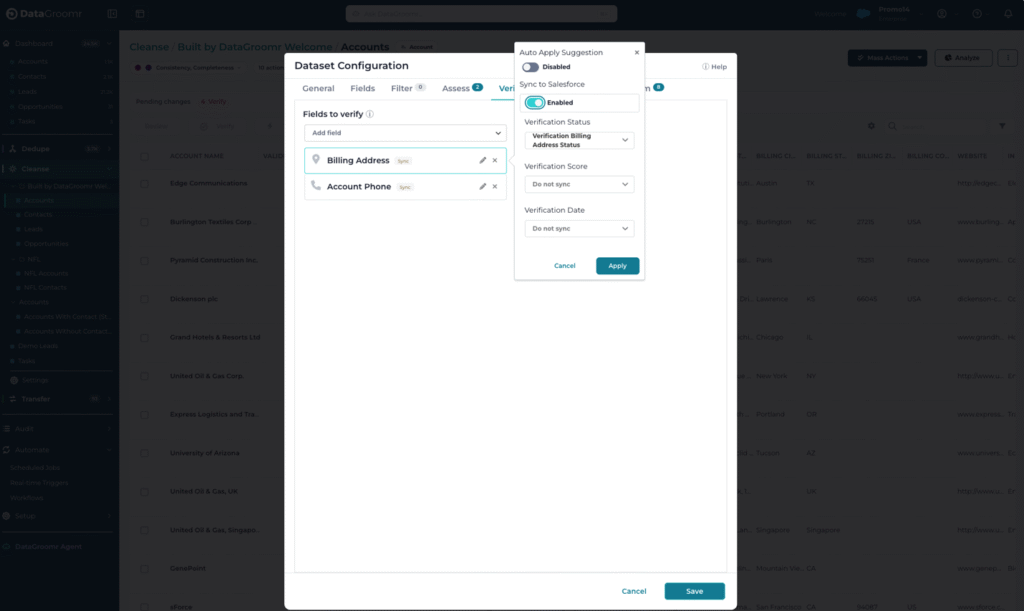
For verification:
- In Cleanse, edit the dataset.
- Click the Verify tab and edit the field you want to sync.
- Toggle on Sync to Salesforce, choose your fields, and save.
And that’s it. The sync runs on its own from here.
Final Thoughts
Standard Salesforce reports cover what most teams need. If leadership wants to go deeper, the same synced data works in Tableau or CRM Analytics, too.
Either way, all that cleanup work you’ve been doing in DataGroomr finally shows up where your team already looks. So go build those reports, show the value of your DataGroomr implementation, and earn that credit. You deserve it!
To see these features in action, request a live demo or start a free trial at datagroomr.com. You can also learn more in the DataGroomr support documentation at help.datagroomr.com.